
After a little shift in platform mentioned before and a bit of learning when it comes to Home Assistant, I have my RGB LEDs installed in my kitchen!
But first, a few more project details.
While I was working on this, it wasn't really convenient to have the huge power supply and a reel of LEDs hanging around. And I also got tired of having the ESP32 on a breadboard with the LEDs flopping around. So, I broke out Fusion 360 and created a little enclosure. I modeled everything using Parameters, so everything is adjustable. That came in VERY handy when I misjudged the offset I needed to make the LED ring fit for instance. I printed the bottom in blue PETG and the top in clear/natural PETG. It had a really nice frosted effect and worked as a great diffuser!
From there, I started to work on the controller code, getting away from WebThings and working towards something that would work with Home Assistant. I took a lot of "inspiration" from the HASwitchPlate project. It has a little different goal, but it had already implemented a lot of the features I wanted. I diverged a little in that I am using an ESP32 and not the ESP8266 (but one of my goals is to get them both working). I also went with a native PlatformIO project where HASwitchPlate is an Arduino .ino project that can be used in PlatformIO. HASwitchPlate also has a bunch of custom code for Home Assistant as well. I'm not going there. My device emulates a Light in HA, so I really don't think I'll need anything other than the microcontroller code. There are chunks of the code that probably still look identical to the HASP code, and there are chunks that are very different now. Like I said, it was "inspiration"
Things I have working in my RGB controller now:
- ESP32 support. It's what I had on hand. I'd like to add ESP8266 support in the future.
- It uses ESP_WifiManager to have a captive portal to configure wifi settings. I won't be accidentally checking in my wifi creds to Github.
- OTA firmware updates using Arduino OTA. This was essential because I don't want to have to climb on top of the kitchen cabinets (or wherever else I use this) with my laptop to update firmware. I'd also like to get the web interface to support OTA updates. That will come in the future!
- HA integration using MQTT and the MQTT Light with JSON schema. This one actually took a couple tries to land on because at first, I didn't know it existed. Then, when I did find it, I didn't read far enough down the docs to find out about the JSON schema. But, once i found it, it really opened up the flexibility of the project and simplified the communication between the mcu and HA! I've got a few more things I'd like to do with the project. As mentioned before, I want it to run on an ESP8266 as well. The ESP32 is nice, but the bluetooth isn't used, so I suppose it could be considered "overkill"? The web interface would be nice for OTA firmware updates because then I could compile the firmware once and just upload it to each device without using PlatformIO. And lastly (at least for now) I'd like to get HA Auto Discovery working. Should take some of the manual config in HA out of it.
For now, here it is, installed in my kitchen! I need to run another power line to the second half of the LEDS though. At higher brightnesses and when running full "white" it glitches and dims. Not a big concern, I usually run them at about 1/4 brightness. But it would be nice to not have to worry about that.
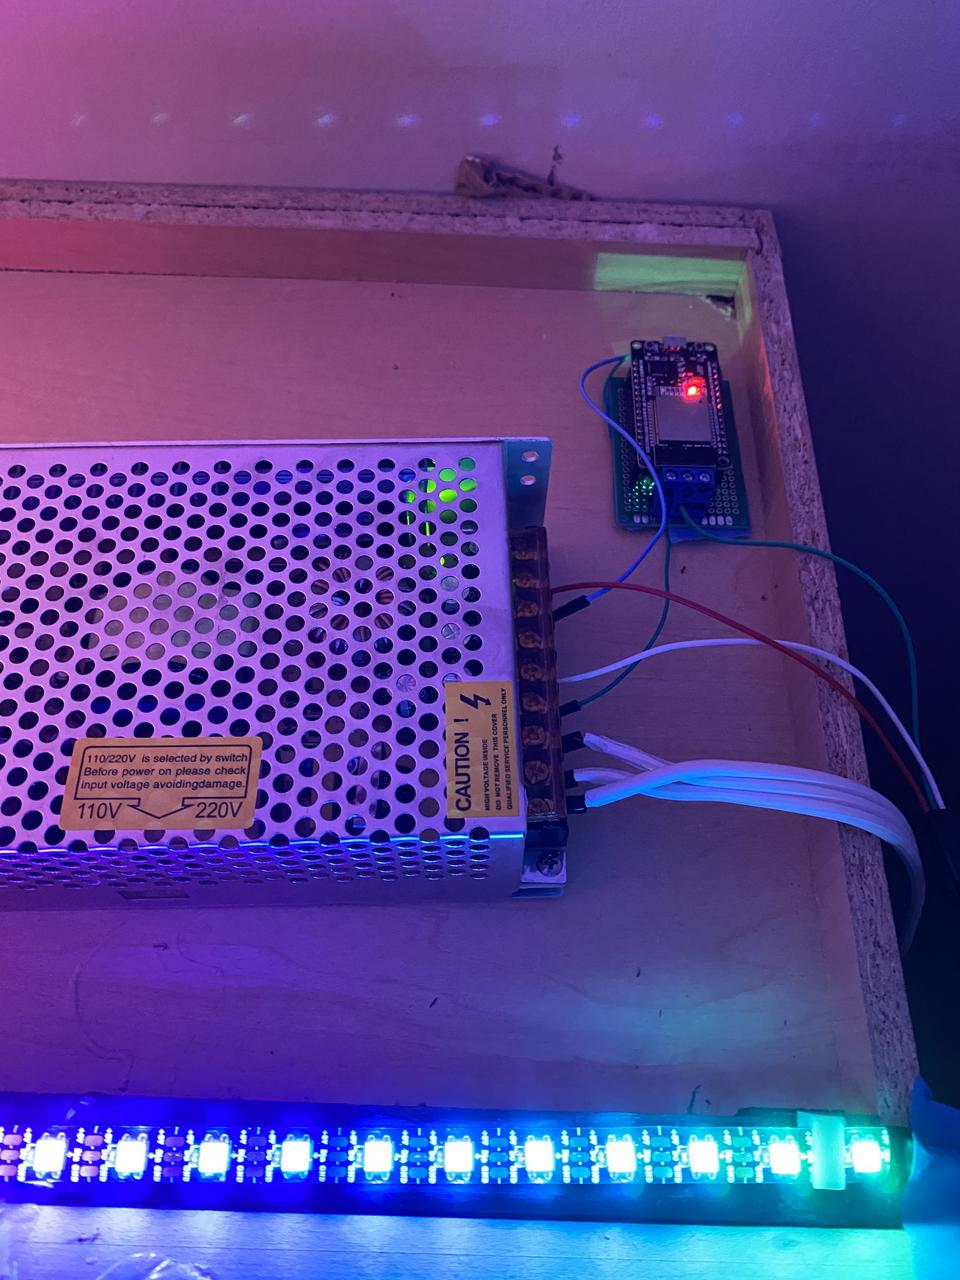
Here it is, all hooked up on top of my kitchen cabinets. The power supply provides power to both the ESP32 and the WS2812B LEDs. There are two wires carrying power and ground to the ESP32. Two other wires are taking power and ground to the LEDs. Then there's one data wire going from the ESP32 to the LEDs. It's a very simple setup.
If you notice some greenish light coming out from under the ESP32, shining on the back of the cabinets, that's because of a little trick I used to control the WS2812Bs without using a level shifter. Underneath the ESP32 is a diode and a single WS2812B. The diode used to supply power to the LED. This drops the voltage a little which let's the 3.3v logic of the ESP32 work with the LEDs which use 5v logic. I was so happy when I found this hack! It really simplified things! You can read more about the details in this HACKADAY article.
Here's a few images of the lights in action. I'm pretty happy with them!